Showing posts with label upcycled. Show all posts

Saturday, May 9, 2020

Another Pair Of Upcycled Overalls


 Another pair of upcycled vintage overalls.
This one has a pink gingham theme.


 Pink gingham front pocket.
Pink gingham lady (from an old apron, I did
the edge embroidery but she was already embroidered.)

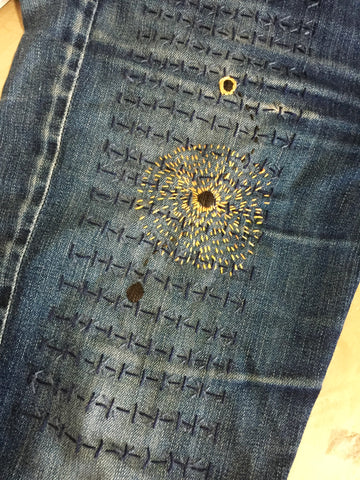
And a little of the sashiko embroidery that I have been doing.
A pink floral patch behind the hole.

 And I used a piece of embroidery from a pillowcase
for two places on the back.

 And stitched around them with blue thread.

She will look good coming or going.
I think I am going to try to sell this pair on ebay.

Monday, May 4, 2020

Japanese Sashiko Visible Mending On Denim


visible mending on denim


Mending with embroidery
I am currently obsessed with Sashiko mending on denim.  I love the sense of history that aged denim has.  I guess that is why some people collect old Levi's.  And if it has patches and repairs -- so much the better.  I think my advancing age gives me a sense of freedom when it comes to how I dress and what I choose to embrace.  I like thinking that the visible mending is just adding another layer of history to a piece of clothing.  And that the history shows....makes it like living art.

(all of the above examples are not my work, but helped inspire me.)
"Sashiko embroidery uses small running stitches to make beautiful designs which are simple and timeless in style. The word Sashiko literally means ‘little stabs’. " It traditionally uses white thread on dark blue cotton.  

 So I decided to take a "little stab" at visible mending on a pair of overalls that had already been mended until mends were about all that was left.  So much the better....

You can use a contrasting piece of cloth underneath a hole or tear so that it peeps out, 
and then stitch on top of both pieces of cloth to keep them in place. 
I really like the random imperfection of the stitches.

You can use a piece of denim or scrap of cloth on top to cover a hole or reinforce an area
 and then stitch over the top. I used this antique handmade lace on a few areas,
it matched the old thread I was using.
I like keeping everything kind of neutral.

I used a couple shades of scrap denim I had on hand 
(plus there had been several shades already used on it).
And I used three kinds of printed blue fabric that I already had.
(Some of the "fabric" was actually clothing hanging in the closet.)

So the project didn't cost me anything but time
(a surprising large amount of time.)

Friday, May 1, 2020

Windmill + Weathervane = Honeysuckle Trellis

 We purchased a lovely honeysuckle vine.
But vines need something to grow on...

 So my husband scrounged a windmill base that we had,
and married it to a weathervane that we also had.

He added some wire mesh around
the whole concoction.  And behold,
we have a trellis for the honeysuckle.

Tuesday, April 28, 2020

Barnwood Egg Holder Trays

I saw my first wooden egg holder tray in a magazine this week.
And I was smitten.
Of course I wanted one.  
And I could have one if I wanted to shell out $25 - $89.

Or I could make my own.  
Fortunately I already had the 1" drill bit hole-maker thingie.
And since I have smaller bantam eggs, that is plenty big.

And I had scrap barnwood, leftover from my husband's boot tray project.
(Check that out here.)
I added a regular standard sized egg in the back so that you
could see the size difference between a "regular" egg and a bantam sized egg.
Really, they do pretty well for their size.

I have to say -- drilling the holes was not that much fun.

It took a lot of pressure and my hand got tired.  
My dreams of making one for every family that owns chickens
 in the state of Missouri dissolved after about the fourth hole. 

But now I have two for myself, and a few to give away.

Monday, April 27, 2020

Upcycled Overalls


Last fall we went to a garage sale and purchased eight pairs of amazing well-worn overalls.  Not only were they well-worn, but they were well-patched.  Patched by a thrifty and talented wife who got all of the mileage possible out of these denims. Read about that here.  I just wasn't completely sure what to do with them.

After cruising around on pinterest, I decided they needed a bit of upcycling.  But I don't have a sewing machine (and don't want one.)  I do know someone who does, and is creative to boot.  So I proposed to her that I hand over the overalls, a bunch of lace and other doodads and set her free.
In return, she would end up with half of the "loot".
She immediately caught the vision but said it would be awhile before she had time to tackle them.  Well, then along came quarantine.  Time to spare.

So last weekend she brought over the finished overalls.  
SO CUTE! And we divided up the eight between us.  
We both will probably keep one (or two)
and sell the rest.  

Sunday, April 26, 2020

My Husband's Corona Virus Isolation Project #10 -- Two Boot Trays


 With the addition of lots of rain and chickens, our mud room was looking like --
 well, a muddy room.

So my husband started the hunt for a "boot tray" where we could set our boots when we came in.

I suggested this little berry basket.
(At that point it did not have a corrugated metal insert or a handle.)  
Nope, too small for his big boots and not heavy duty enough.
But he said he would go ahead and make it for the guest cottage.

After looking at farm stores and on-line, he decided to make one himself.

 He used old barn wood that we already had.
And "Helmsman" wood finish that we already had.
And corrugated tin that we already had....
And made the nicest looking boot tray that I have ever seen.
Goodbye to mud in the mud room.

Sunday, March 8, 2020

Bedside Tables Get A Tin Ceiling Topper


I bought these a couple of weeks ago for the new guest cottage.
They were green, I painted them a pale gray.
Then some stains bled through the new paint on top.

 So I grabbed a full sheet of old ceiling tile,
and cut it into bitsize sections.

After I pounded down the front and back sides,
I trimmed the corner sections out.

 Then I hammered down the sides.

 Love the look.
I don't think I need to nails down the sides.

Top looks great and will be flat enough for a bedside light.
Ended up not using these at the guest cottage, too big.

Thursday, September 12, 2019

A Pair Of Upcycled Wicker Side Tables

My husband got this pair of wicker side tables on the last day of an estate sale.
He paid $5 for the pair.
The problem?
They didn't have any tops.
The positives?
Super sturdy construction and cute as a button.

I dug out some old boards that I had from a
deconstructed crate.  (That writing is original!)

 
I got to use my "new" saw that I inherited.
It worked great.  Then I tried a little area with a jig saw
(see crooked area on the right side -- not so great :()

I used both nails and screws to secure the boards.
And then light brown briwax over the top.
Maybe better than new.

Tuesday, July 16, 2019

Three Vintage Photo Windows


 I bought all three of these windows last week for $4 each.
It is hard to find the multi-panel windows in such a good size.
I added "adopted family" photos to the first one and liked it so much
 that I also added photos to the other two.

 This one I did with all babies.
I should have taken some close-ups --
a couple of the mats had great graphics.

This was my "Be Happy" window.
It is not easy to find old photos of people who are smiling.

Wednesday, March 20, 2019

Faith Grain Bin Planter

One of those projects that take months to accumulate the pieces,
and even more months to put them together.
The grain bin has a hole in the bottom,
so it will make a great planter.

Sunday, July 15, 2018

Pallet Tables For The Ozark House


 Saturday we had a very exciting delivery at the Ozark house.
We were fortunate to meet Shawn and his wife as they were 
bringing a piece of pallet furniture into a vintage shop.
I ran after him because I thought it would be perfect for our pantry space...
but it was just inches too big.  Still, he was kind enough to say that
he would build one to my specifications....and one became two.

 The first table is for the laundry area.
I just love it.
I never had a folding / sorting area before.

I had already purchased the tubs,
in preparation for this moment.

And I had been saving this pop opener for such a time as this.


This is a photo of the area before we took down the weird 3" deep
tiny cabinet that once was in the "pantry" area.

Here is the area after removing the cabinet
and putting the pallet pantry shelves in place.
  He built a triple shelf to exactly fit that strange space.
It will be our microwave and coffee station on the top,
and have important storage underneath.
The kitchen is so tiny, which makes this little "pantry"
super important.  Can't wait to get it set up.

Blue Hearts & The End Of My Blog

Early on during the corona virus, I did this project. When we put scalloped wood trim on the guest cottage door, we had some of the trim ...